

Where To Start When Drawing A Face
If you desire to draw lifelike portraiture, knowing how to describe facial features is essential. Below, creative person and instructor Lee Hammond shares tips and techniques for drawing realistic faces with graphite pencil, excerpted from her book, Lee Hammond'due south All New Big Volume of Cartoon .
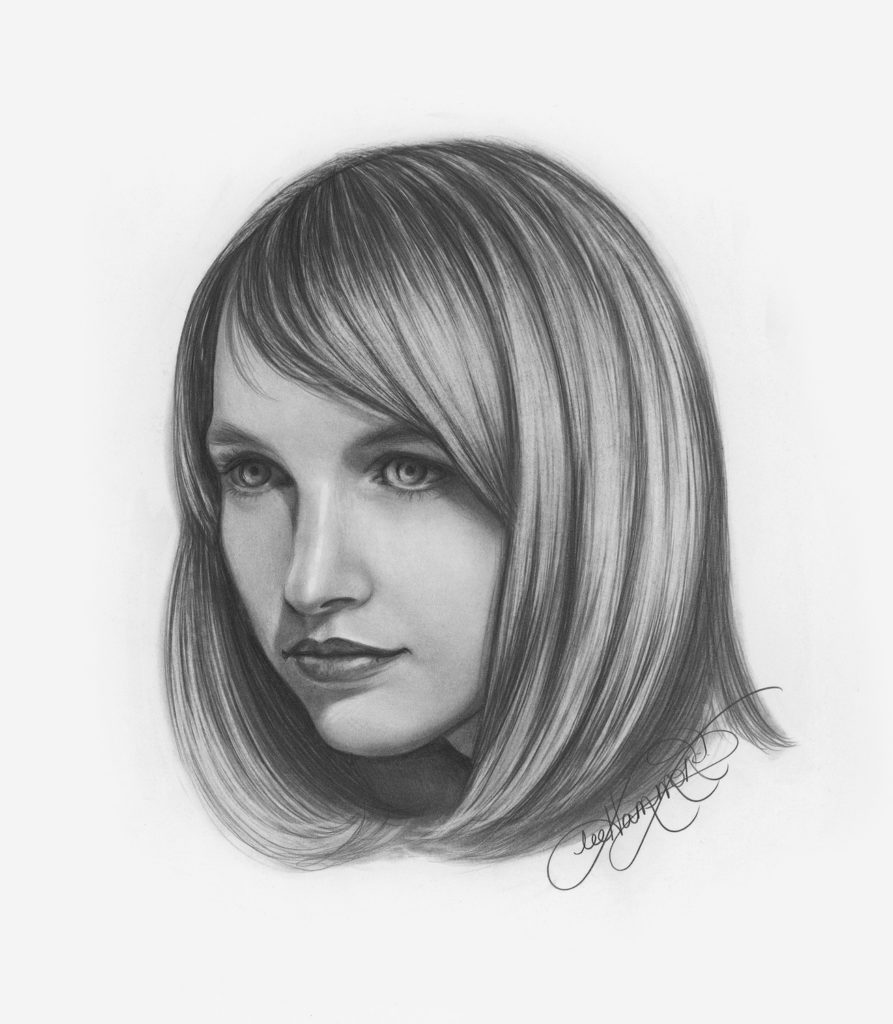
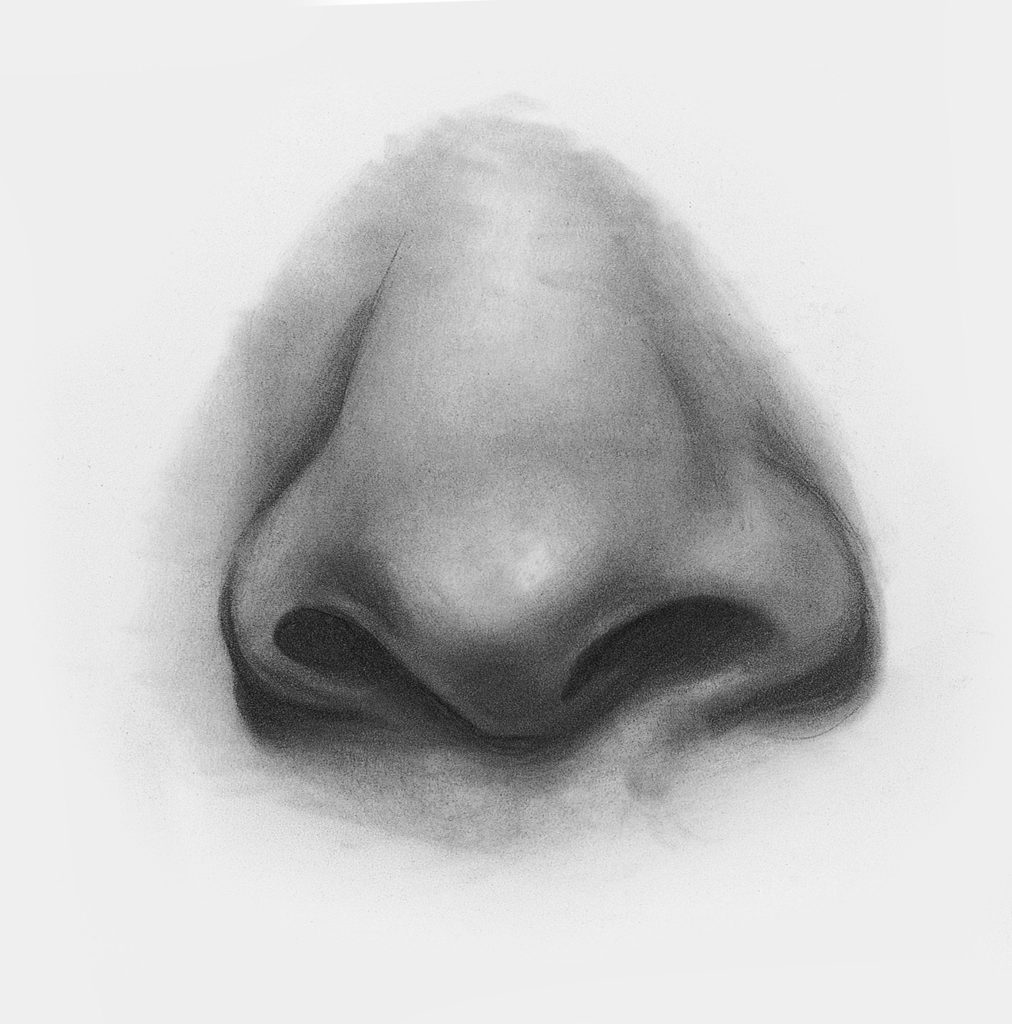
In this step-past-pace guide, Lee will teach you how to recreate every aspect of your model's face: the optics, nose, cheeks, and mouth. Then yous understand where nosotros're heading in this tutorial, here'south our finished production kickoff.
More Resources on Drawing Faces and People
Video Lesson: How to Draw an Eye
Drawing the Curve of Cheeks, Chins, and Noses Drawing Hair
Drawing Facial Hair Avoid These 5 Mistakes When Drawing Portraits
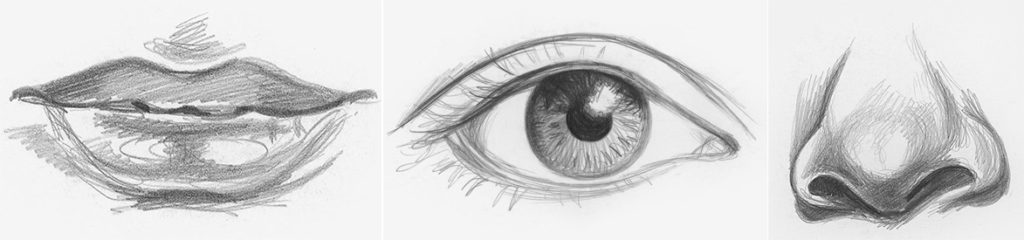
Learning to Draw Facial Features
At present, before yous can depict an entire face, you must outset acquire to depict each of the facial features individually. Simply by taking i characteristic at a time can you learn the anatomy well and sympathize what to expect for and what to capture in your drawing.
Drawing Noses Two Ways
The nose is the least complicated characteristic and well-nigh closely resembles the sphere, as noted. The five elements of shading are piece of cake to see. It is of import to learn to draw facial features in different poses.
These directly-on and profile views of the olfactory organ will give you ample do. Follow the steps to describe a nose in both views.
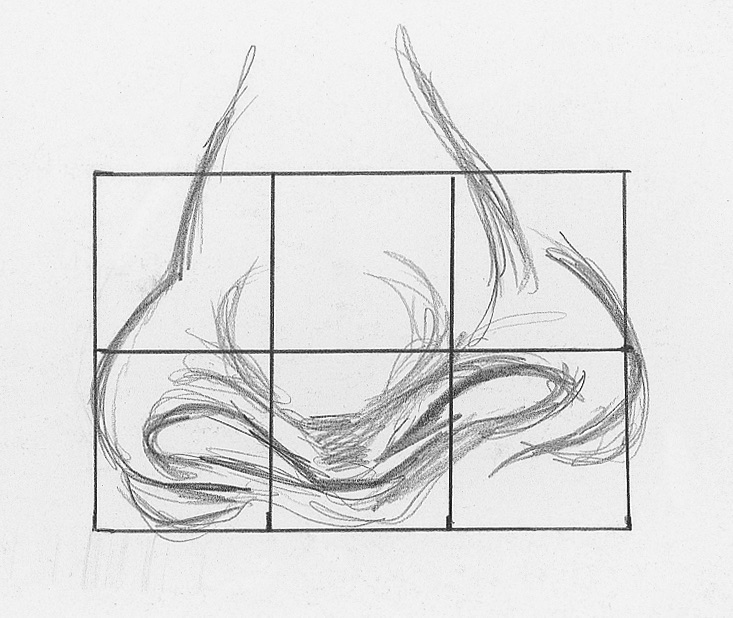
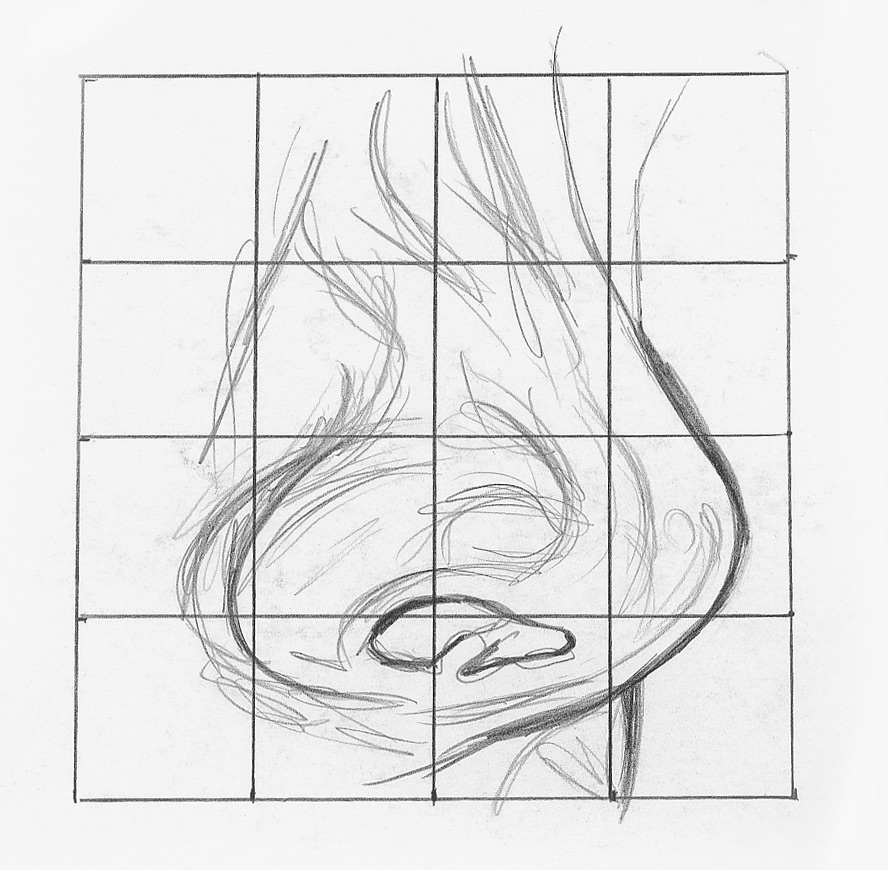
Drawing a Nose: Direct-on View
1. Create a Line Drawing
Utilise the grid method and a mechanical pencil to create a line drawing of a nose in a directly-on view.
2. Develop the Lights and Darks
Beginning and foremost, when you are sure of your accuracy, carefully remove the grid lines with a kneaded eraser. So, develop the patterns of low-cal and dark with a pencil. Starting time by cartoon a sphere to learn lifelike shading and facial curves.
Second, add together reflected low-cal along the edges of the nose and the rim of the nostril. Add together a shadow edge under the tip of the nose to make it look rounded. Place cast shadows nether the bottom edge of the nose.
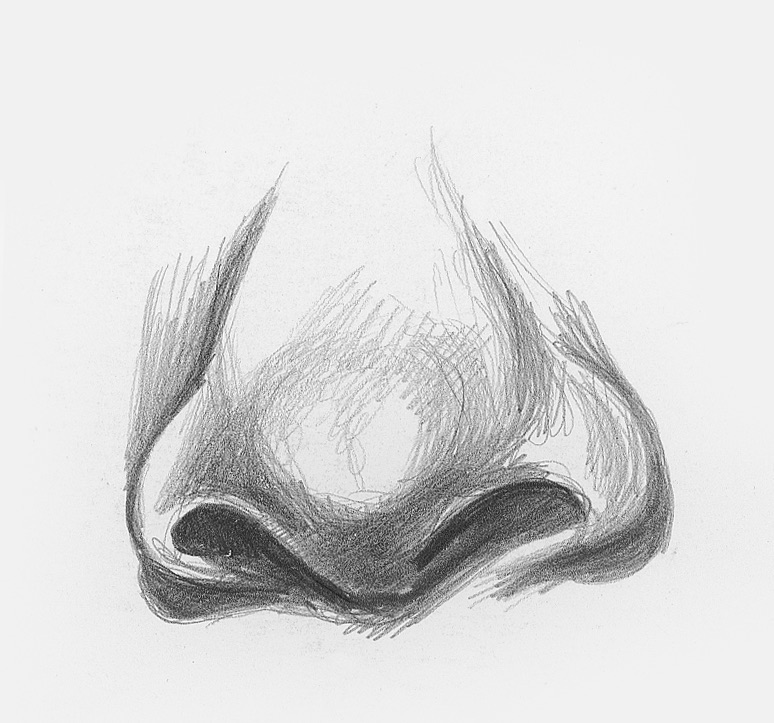
3. Alloy
After you add your light and nighttime tones, blend them smooth with a stump or tortillion. Very little of the cartoon should be left white. Many artists volition leave peel tones as well light, but only the highlights should be as white as the paper.
Exist sure to blend out from the dark areas into the lighter face surface area, just like y'all did in the sphere exercise. This makes it appear real.
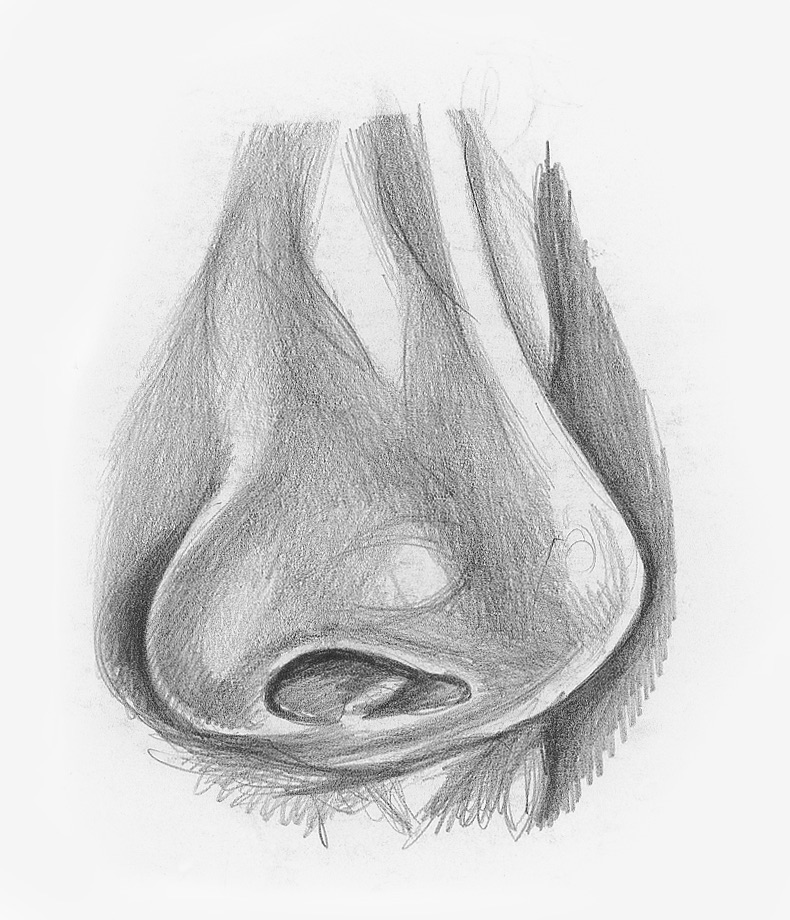
Drawing a Olfactory organ: Profile View
1. Create a Line Cartoon
Apply the filigree method and a mechanical pencil to create a line drawing of a nose from a side view.
two. Develop the Lights and Darks
When yous are certain of your accuracy, advisedly remove the grid lines with a kneaded eraser then develop the patterns of light and nighttime with a pencil. Again, exist sure to refer to the sphere exercise to render the tonal value variations of light shining.
3. Blend
Alloy the tones smooth with a stump or tortillion. Apply the dark tones behind the nose to make the edges stand out.
Lighting is crucial. The dark groundwork makes this example look very different from the previous 1.

Video Lesson: How to Draw a Olfactory organ and Rima oris
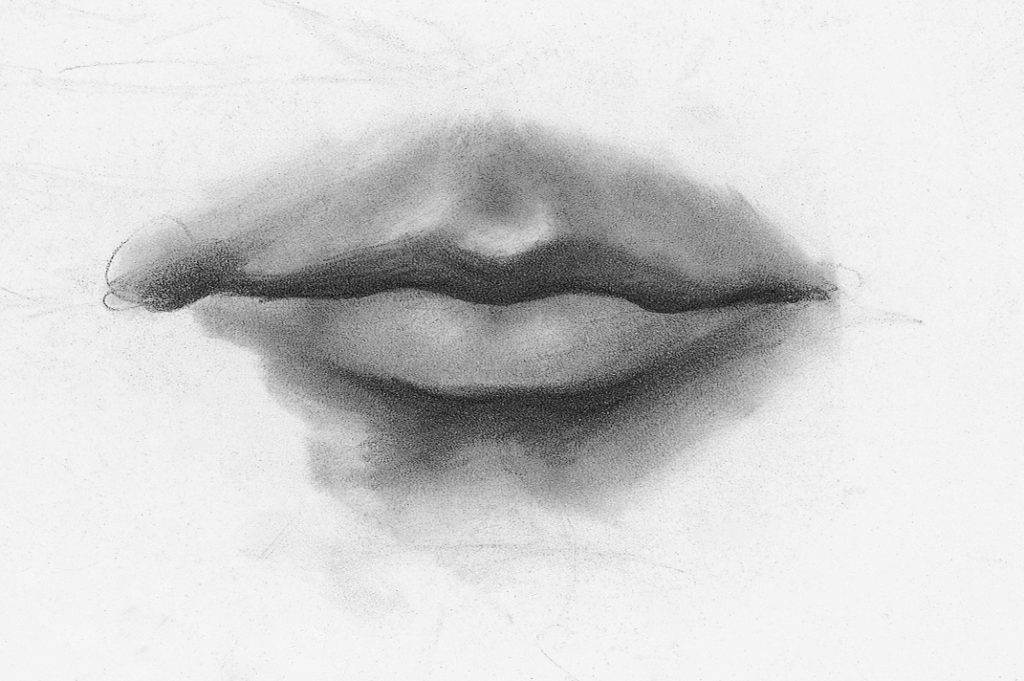
Drawing Male and Female person Mouths / Lips
Drawing a mouth can be a challenge, but you lot tin depict realistic lips when you break the procedure into simple steps. Follow forth to create a total, realistic oral fissure and avoid making simple cartoon mistakes, like defining hard edges, that beginning artists tend to make.
When studying the oral cavity, you volition notice the upper lip is unremarkably smaller and will appear darker than the bottom lip. It creates an Yard shape.
There are differences between male and female person lips. Female mouths are much more defined and seem fuller and shinier. The edges of male person lips are more than subtle and are described by the shadows around them more than the edges themselves.
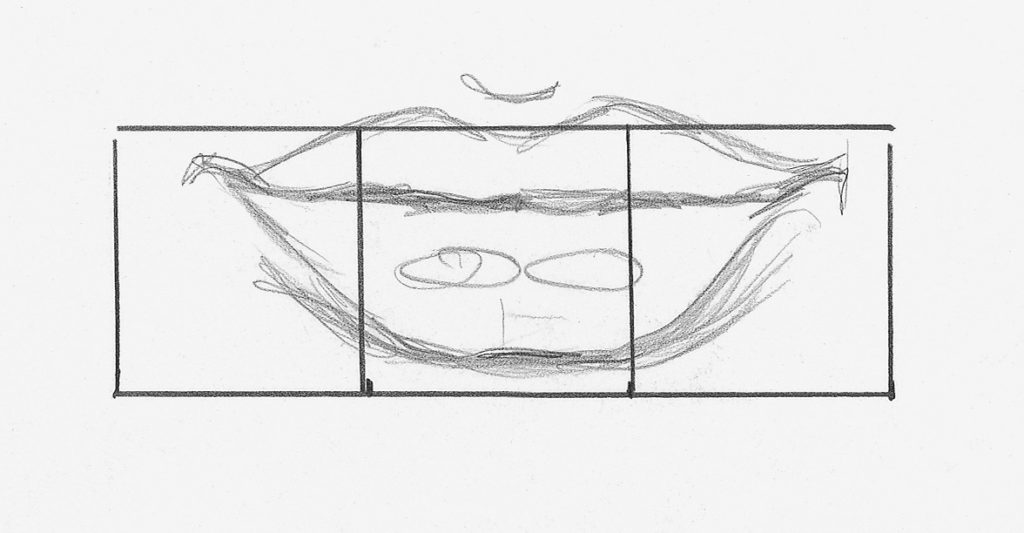
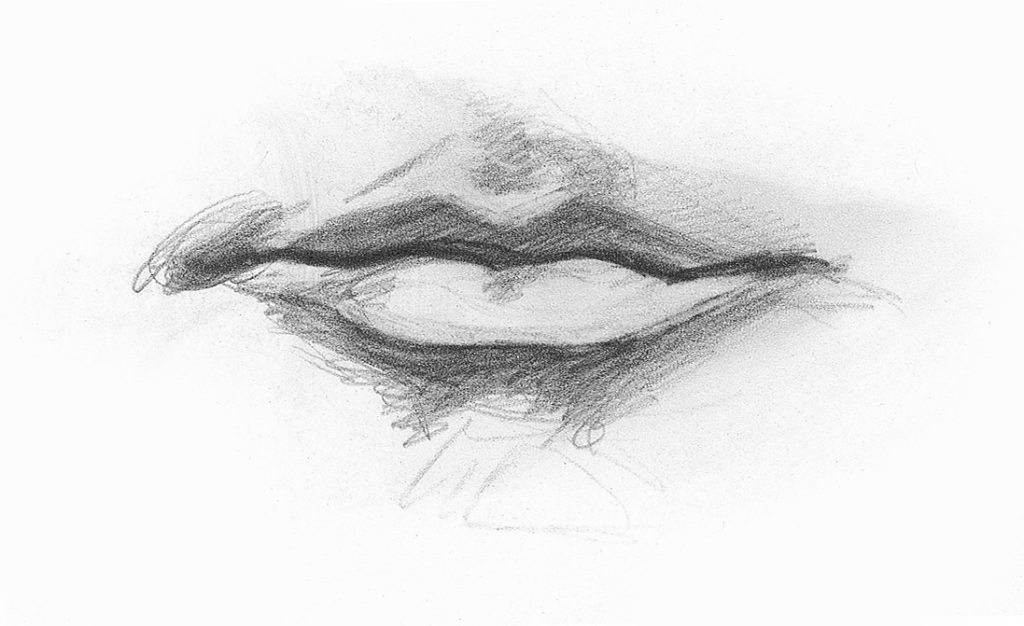
Drawing Lips | Female person
1. Create a Line Drawing
Use the grid method and a mechanical pencil to create a line drawing of female lips.
2. Employ the Dark Patterns
When you are sure of your accuracy, advisedly remove the grid lines with a kneaded eraser. Apply the night patterns of the lips with a pencil.
Make the upper lip darker than the bottom one. This is considering the upper lip angles in, and the lesser lip angles out.
3. Alloy Tones and Low-cal Highlights
Blend the tones smooth with a tortillion. Be sure to create the tones of the skin around the lips so that they await realistic. Use a kneaded eraser to elevator the bright highlights of the lower lip to make them look moist and shiny.
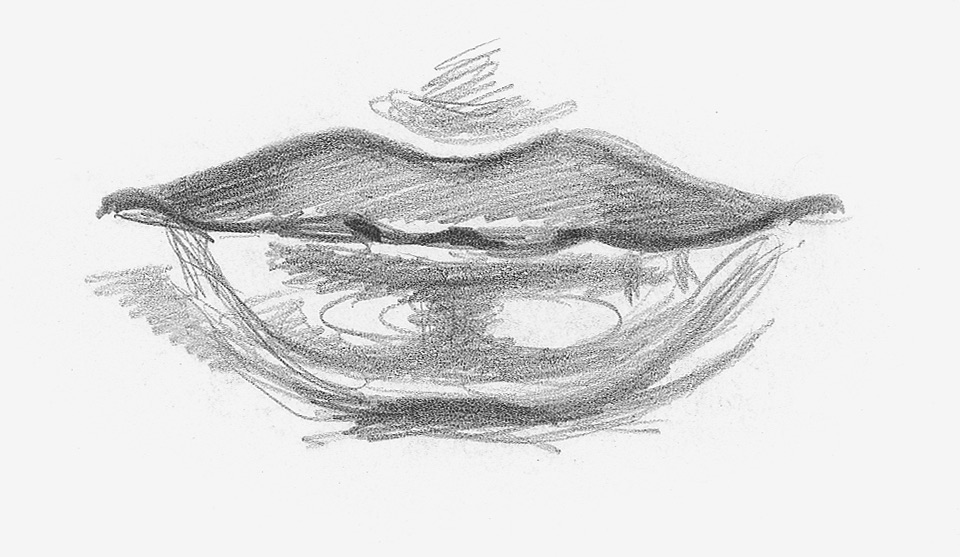
Drawing Lips | Male person
ane. Create a Line Drawing
Utilise the filigree method and a mechanical pencil to create a line drawing of male lips.

ii. Add together Dark Tones
When you lot are certain of your accuracy, carefully remove the filigree lines with a kneaded eraser. Add together the darkest tones beginning with a pencil.
3. Alloy and Lift
Blend the drawing with a stump or tortillion to remove the white of the paper. Deepen the dark areas with your pencil and and so lift low-cal areas out with a kneaded eraser.
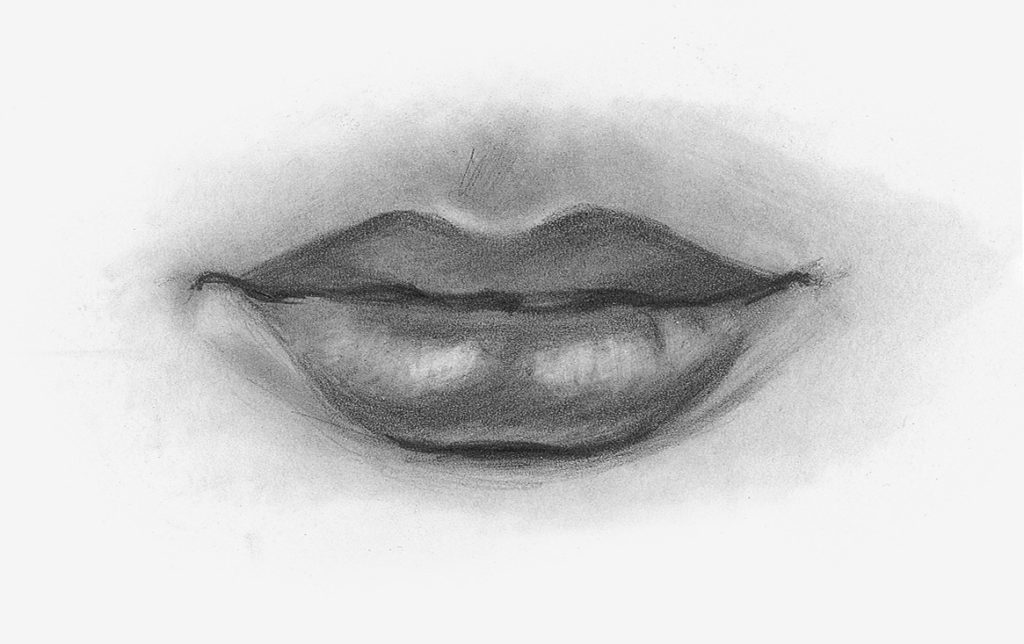
Cartoon Smiles
Mouths become much more hard to draw when the teeth are showing. When drawing teeth, never draw a hard line between each tooth. Because the teeth touch, a difficult line would make them wait too separate by representing a dark infinite.
They should also have some shading applied. Teeth are dimensional, so leaving them white would make them look apartment. As the teeth recede into the mouth, the shadows get darker. The bottom teeth are always a bit darker besides since they do non protrude as much.
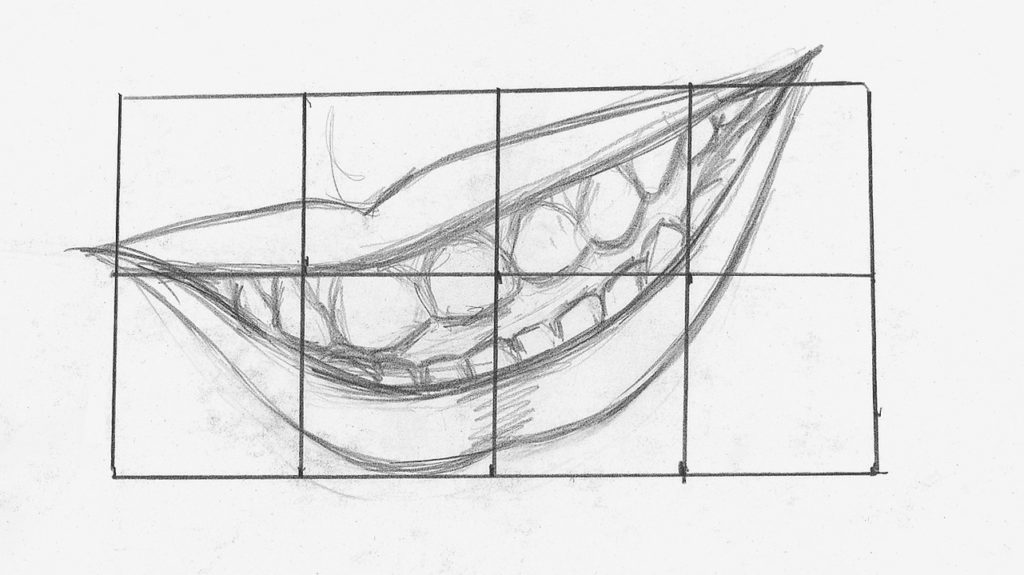
one. Create a Line Cartoon
Use the grid method and a mechanical pencil to create a line drawing of a mouth and teeth. Each tooth must be perfect to create a good likeness.
Do not draw hard lines between each tooth. For accuracy, describe the shapes of the glue line and the edges of the teeth.
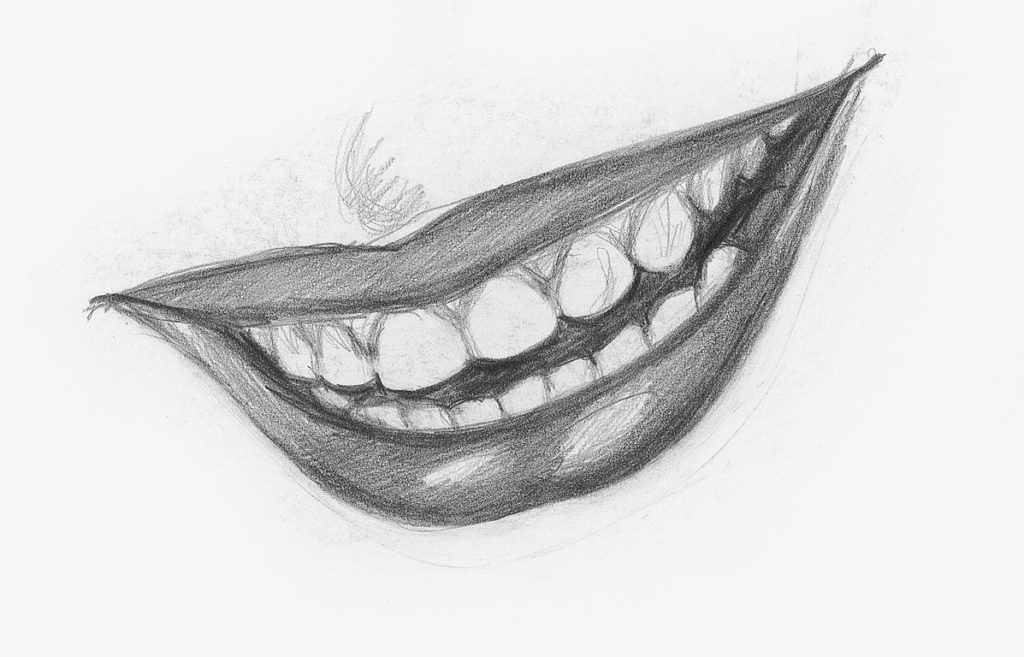
2. Utilize Dark Tones
When y'all are certain of your accuracy, carefully remove the grid lines with a kneaded eraser. Apply the darkest tones with a pencil. Information technology is darkest inside the mouth. The upper lip is darker than the lesser lip and does not have vivid highlights.
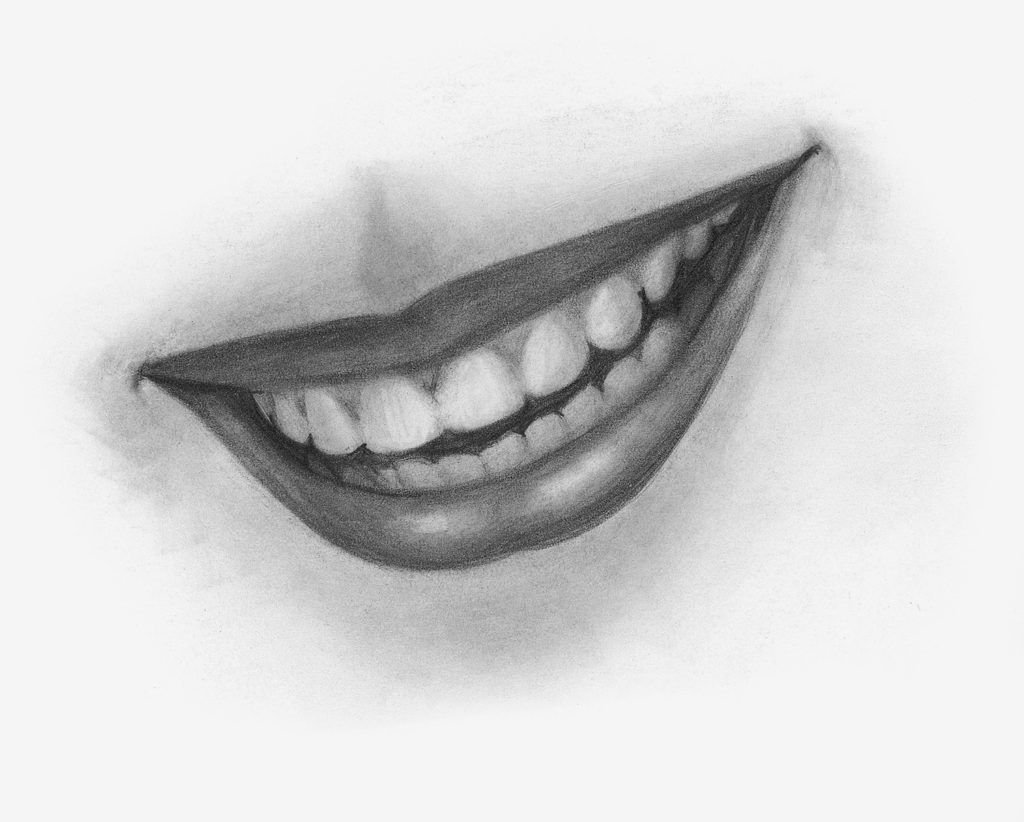
three. Blend, Add Shading and Lift
Blend the tones smoothen with a tortillion. Utilize some shading to each tooth to make sure they look dimensional. Lift the highlights of the bottom lip so that they expect full and shiny.
Proceed the lines between the teeth subtle. Utilise a kneaded eraser to soften where they touch on.
Drawing Eyes
There are many components to the eye and all of them are important. Here are a few hints to help you:
- The iris and the educatee are perfect circles when the middle is looking direct at y'all. If turning away or looking upwardly and down, they go ellipses.
- The pupil is always perfectly centered within the iris.
- The pupil is the darkest part of the eye. Make full it in as night and smooth as possible. Leave an area for a catch light.
- The catch light should be half in the pupil and half in the iris. If the photo shows it blocking the pupil, movement it over.
- The lower hat thickness below the iris is very important. Never but draw a line under the heart. This small detail gives the eye dimension.
- Patterns inside the iris volition vary depending on the colour of the middle and resemble a starburst.
- The white of the middle needs to exist blended to resemble a sphere shape. Never just leave this area (the sclera) white.
- The lashes on the upper lid come together to brand a dark edge called the lash line.
- The upper eyelid recesses, making the eyeball take on a sphere shape.
At present permit'southward move on to drawing an center.
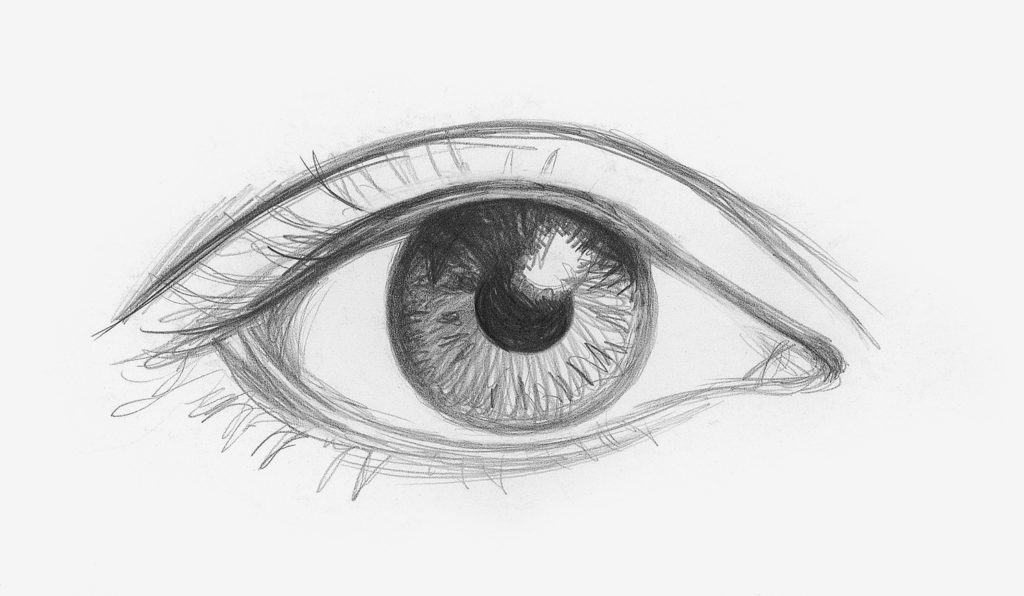
i. Create a Line Drawing
Apply the grid method and a mechanical pencil to crate a line drawing of an centre.
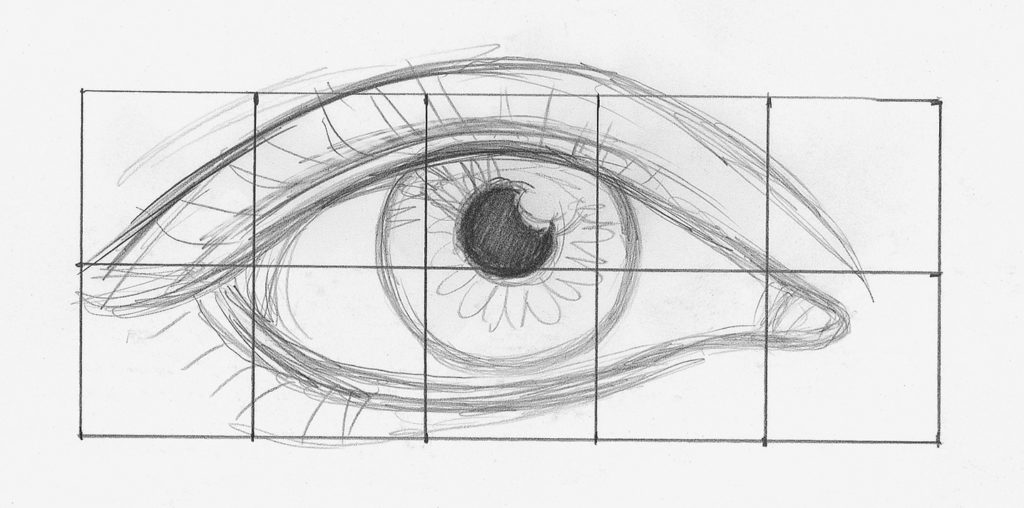
two. Lay in the Patterns and Blend
When you are certain of your accuracy, carefully remove the grid lines with a kneaded eraser. Then, lay in the patterns of the iris with a pencil. Employ pencil lines that resemble a starburst pattern or carriage wheel spokes.
Leave an area open for the catch light (one-half in the pupil and one-half in the iris). Alloy things smooth with a tortillion. Employ a kneaded eraser to lift the take hold of light and increment the patterns in the iris.
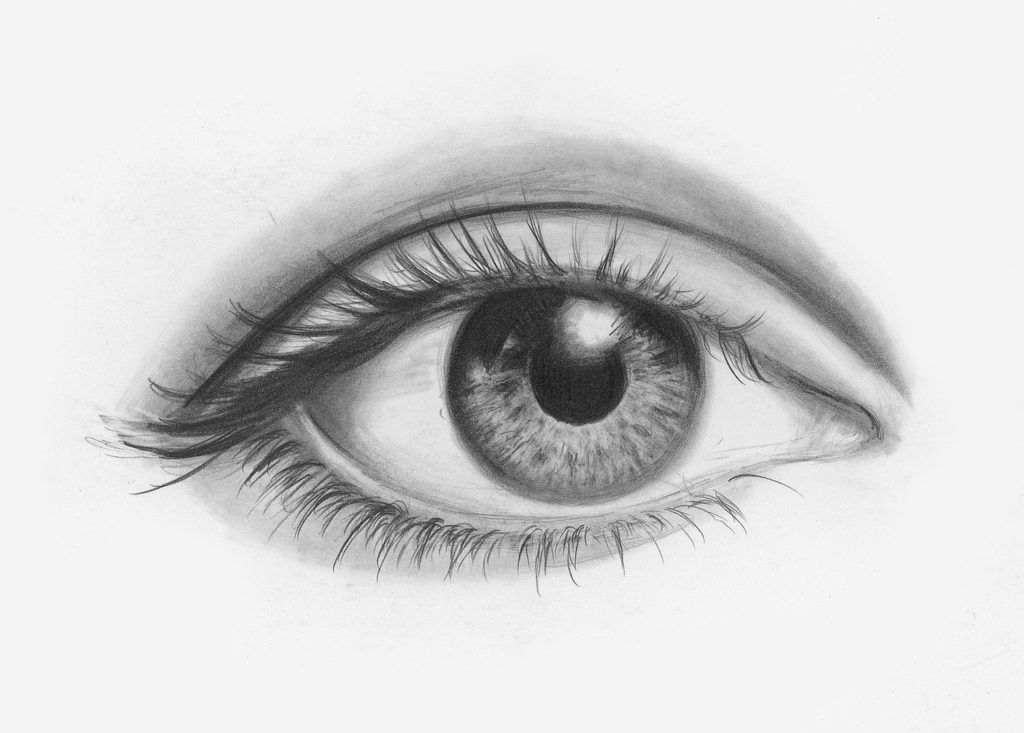
three. Go on Blending and Shading, Add Eyelashes
Alloy the skin areas of the cartoon to create the form and contours. Shade the white of the eye to get in look rounded similar a sphere.
Add the eyelashes with very quick strokes that taper at the ends. They grow in layers and clumps, so do non make them become all along in a row.
Notice how the lashes on the bottom grow from the lower edge of the lower lid thickness. You can meet how much dimension the lower lid thickness gives to the look of the eye.
Video Lesson: How to Draw an Eye
In this episode of our live weekly Drawing Together series, creative person Scott Maier shows how to draw an eye.
Drawing Noses and Optics Together
Once y'all acquire the anatomy of the eye and how to draw it realistically, it is important to sympathize how to put 2 of them together along with other facial features like the nose. Hither are some guidelines to call back:
- The space betwixt the eyes is one eye width.
- Both eyes should be directly across from each other.
- If you describe a vertical line down from the corner of the heart, information technology volition line upwardly with the edge of the nose. (This tin change co-ordinate to dissimilar ethnicities.)
- Both eyes must be looking in the same management. The pupil and iris must be the same in both.
- Place the catch light in the aforementioned place on both eyes (half in the pupil, half in the iris).
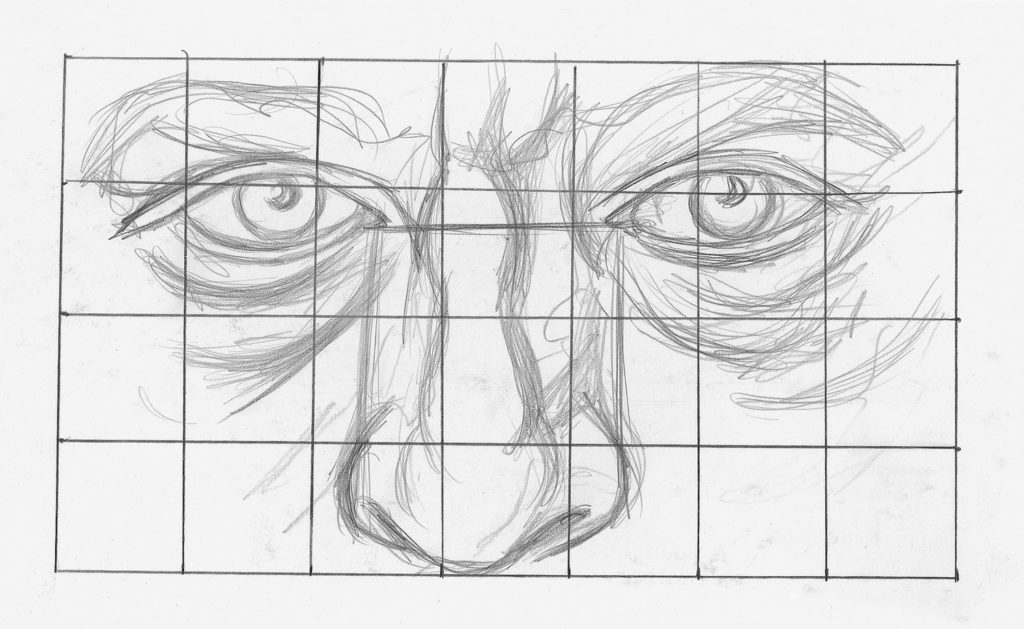
1. Create a Line Drawing
Use the filigree method and a mechanical pencil to create a line drawing of a olfactory organ and optics together. Notice how the vertical line drawn down from the corner of the eyes lines up with the edge of the nose. Place the eyes direct across from 1 another.
2. Apply Dark Tones, Fill up in the Shadow Areas and Eyebrows
When you are sure of your accurateness, carefully remove the grid lines with a kneaded eraser. Use the darkest tones with a pencil.
The pupils of the optics are the darkest areas. Fill in the tones of the shadow areas and the eyebrows. The eyebrows should exist shaded in every bit a shape beginning, before the hairs are practical.
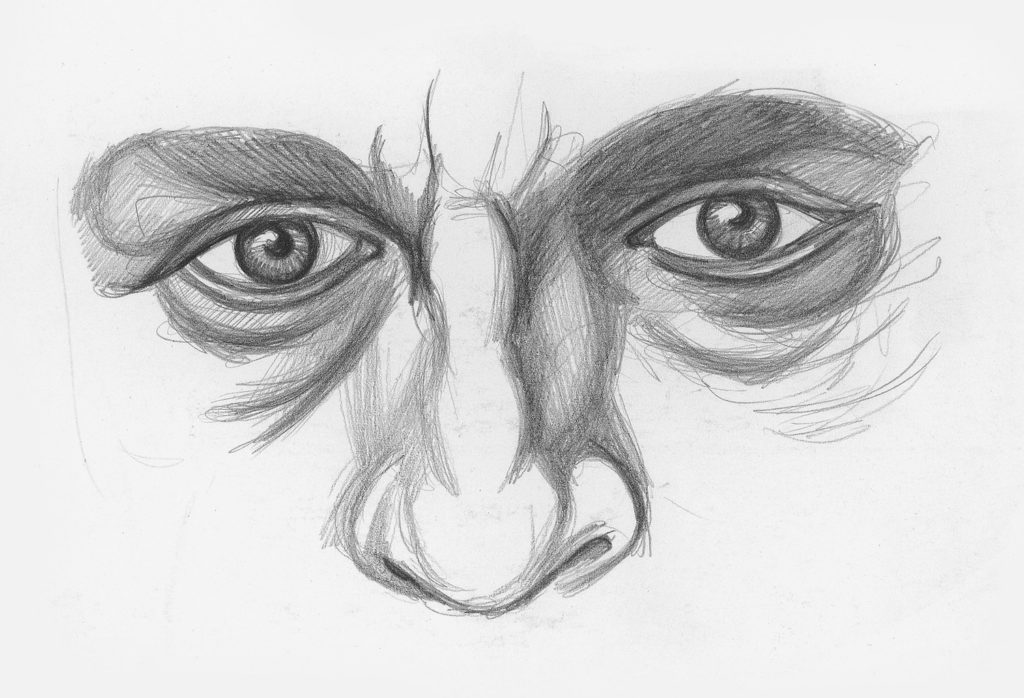
3. Blend and Utilize Highlights
Blend with a stump or tortillion. Very little of the paper should exist left white, even in the whites of the eyes. Use a kneaded eraser for the small highlights seen in the brows and patterns inside the pupils.
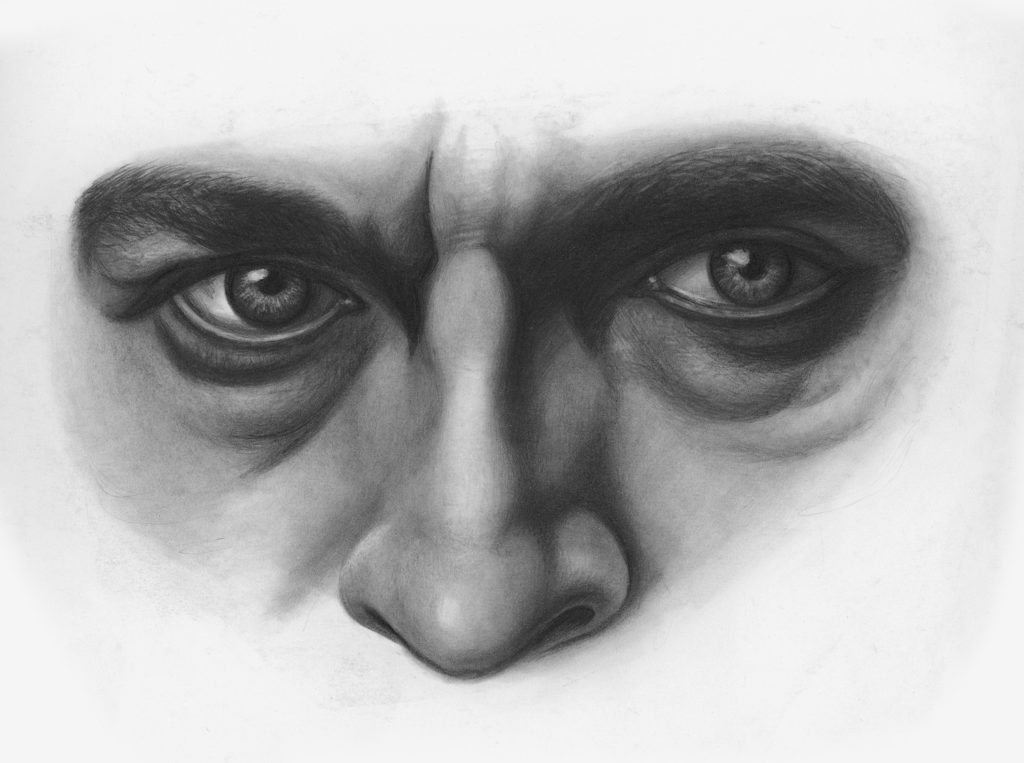
Drawing Optics from an Angle
This project will help yous encounter things from a dissimilar vantage point. When y'all draw facial features of a person who is at an angle, the rules modify.
The features look distorted due to the perspective. In this view, the contour of the nose is blocking one of the optics and only a small portion of the confront is showing on that side.
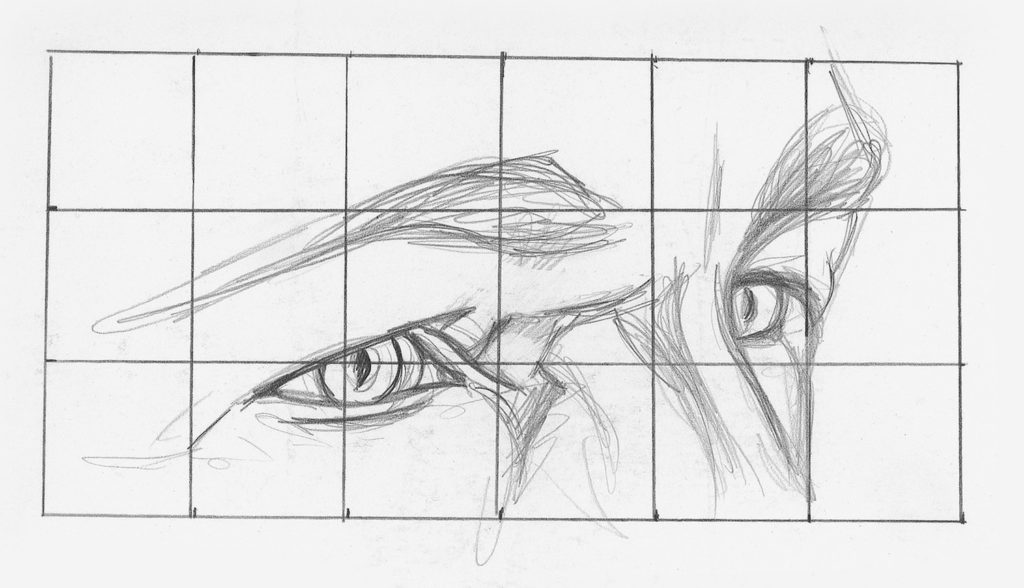
1. Create a Line Cartoon
Use the grid method and a mechanical pencil to create a line drawing of eyes in a slightly angled pose. Notice how this bending blocks the view of office of the face.
The irises and pupils now are vertical ellipses, since the eye is not looking directly at you. The perfect circle is now changed due to the perspective.
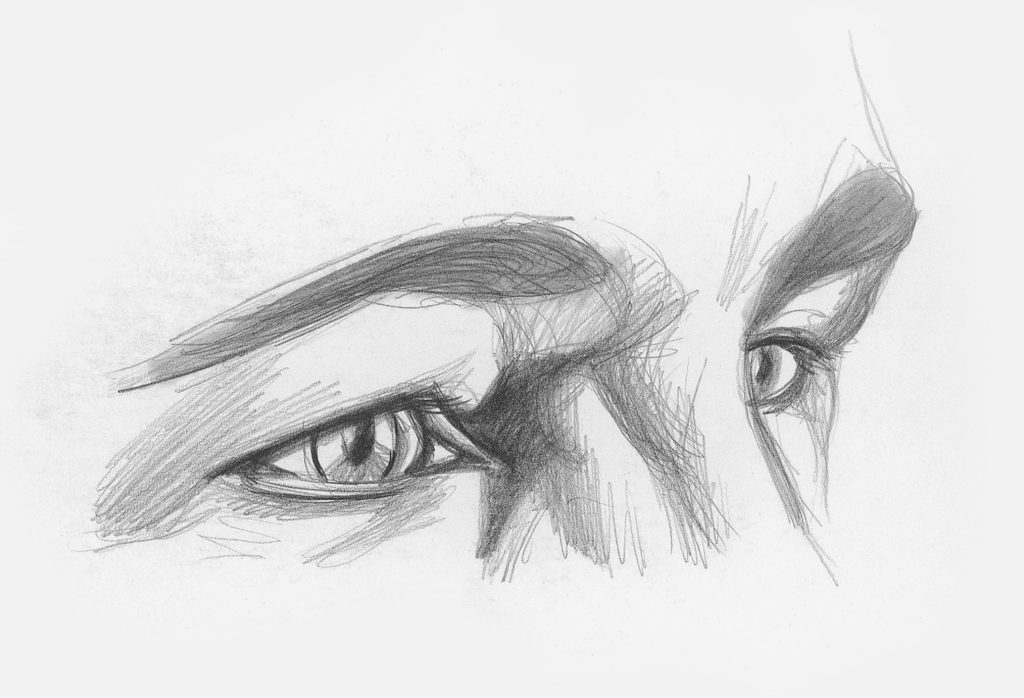
2. Apply Darks, Add Shadows and Blend the Eyebrows
When you are sure of your accurateness, carefully remove the grid lines with a kneaded eraser. Employ the darkest tones with your pencil to create the shadows. The pupils of the optics are the darkest areas. Blend the shapes of the eyebrows to a gray tone.
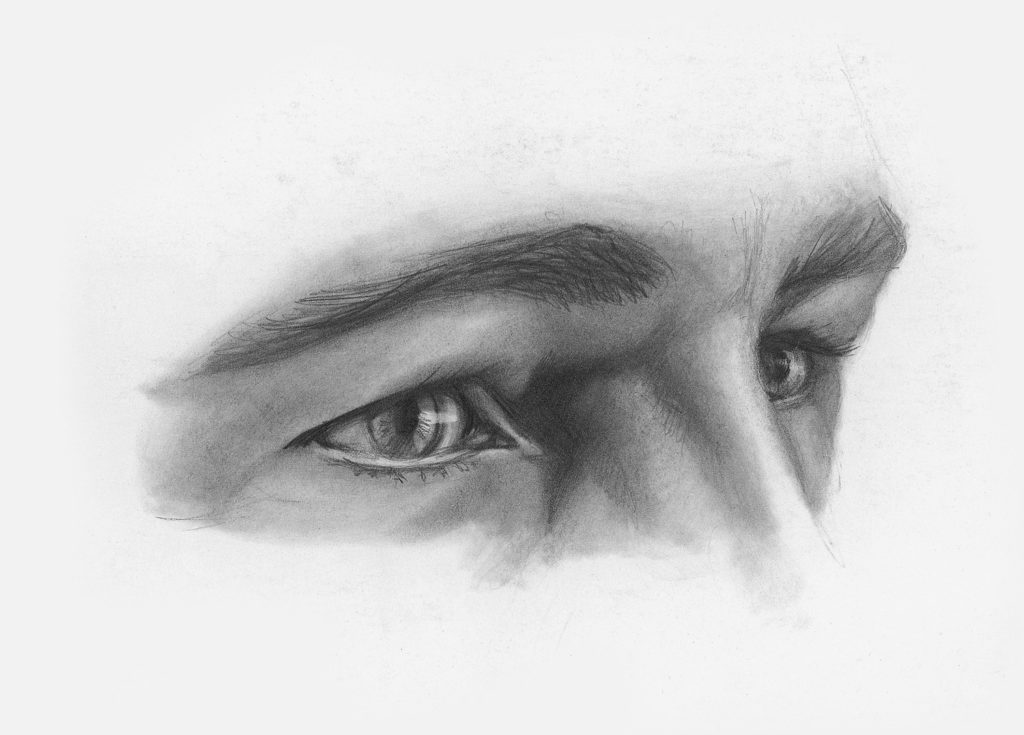
three. Blend and Lift
Blend the pare areas with a stump or tortillion. Use a kneaded eraser for the modest highlights seen in the brows. Create the patterns within the pupils and elevator the catch lights.
Cartoon Ears
Ears are one of the most difficult features to draw because hey are made upward of foreign shapes. We don't peculiarly pay much attending to ears unless they take earrings or are larger than normal. Either way, they are not shapes that we often remember virtually.
To draw a good portrait, you must learn the beefcake of the model to make them await convincing. It is a good idea to practice drawing ears in a variety of angles and poses, too. Practicing all views is of import if y'all want to be skillful in portrait drawing.
Video Lesson: How to Draw an Ear
In this episode of our weekly live Cartoon Together series, creative person Scott Maier shows how to depict an ear.
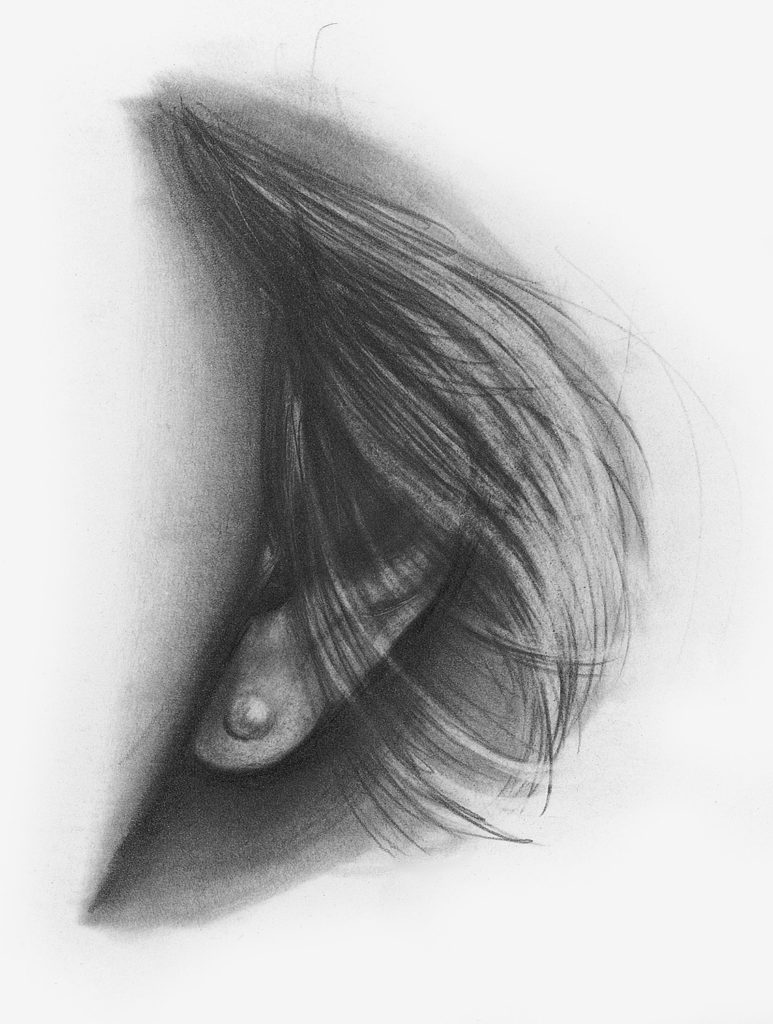
Drawing Ears: Front View
This is a typical forepart view of an ear seen on a portrait. Much of the anatomy is blocked by the hair. Only the protruding role of the earlobe is visible.
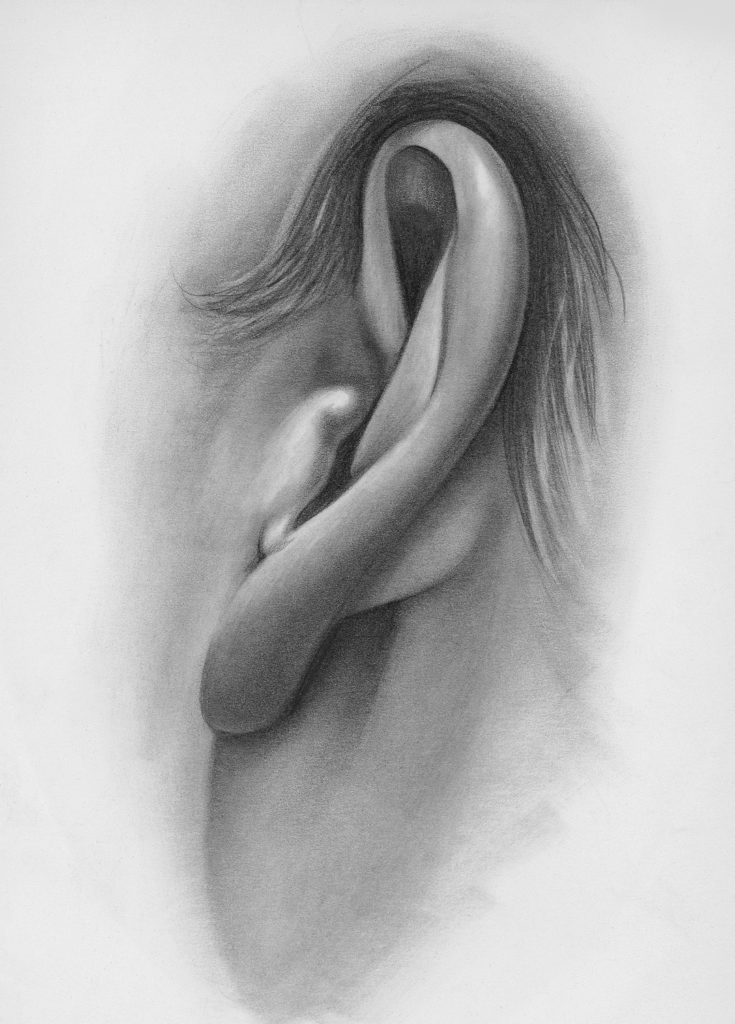
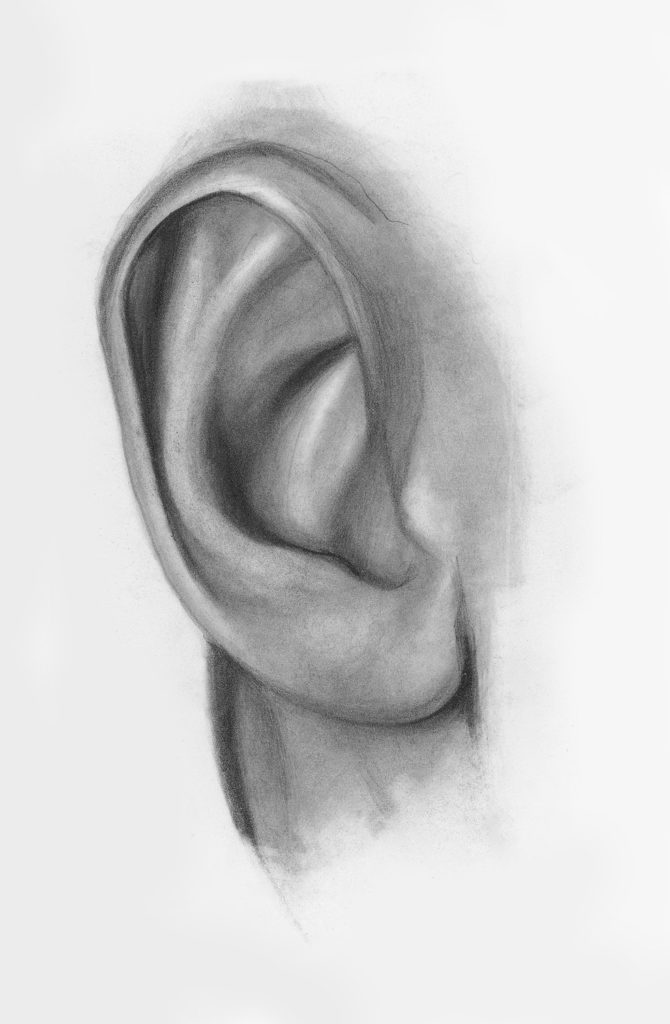
Drawing Ears: Side-Angle View
This side-angle view shows the complexities of the ear. Information technology is certainly not a typical pose, but yous never know when yous may have to describe a person in an unusual pose.
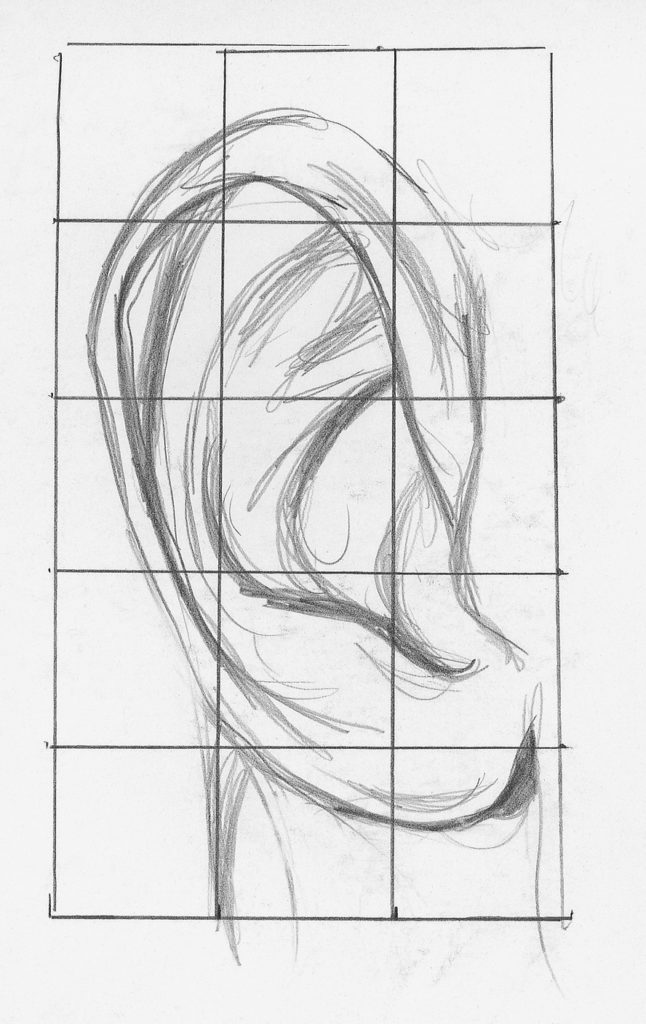
Drawing Exercise: Learning the Anatomy of Ears
This practice will help you learn the beefcake of ears. They are made upwards of many intricate shapes that all nestle together. The grid method helps to make them appear more than like a puzzle.
Here are some things to go along in mind when drawing ears:
- The outer ear overlaps the inner ear.
- The inner ear has an area that resembles a Y. Wait for information technology in every ear yous draw.
- The skin of the ear is different. Information technology is more oily, and so highlights can appear very bright.
- There is a protruding expanse of the inner ear that acts like a cup.
- The earlobe often resembles a sphere.
1. Create a Line Drawing
Use the grid method and a mechanical pencil to create a line drawing of an ear. Look at it like a puzzle of interlocking shapes.
2. Utilise the Darks
When you are sure of your accuracy, carefully remove the grid lines with a kneaded eraser. Use the darkest areas with a pencil.
Create shadows underneath where the outer ear overlaps the inner ears. Resist the urge to outline too much. Let shading create your edges.
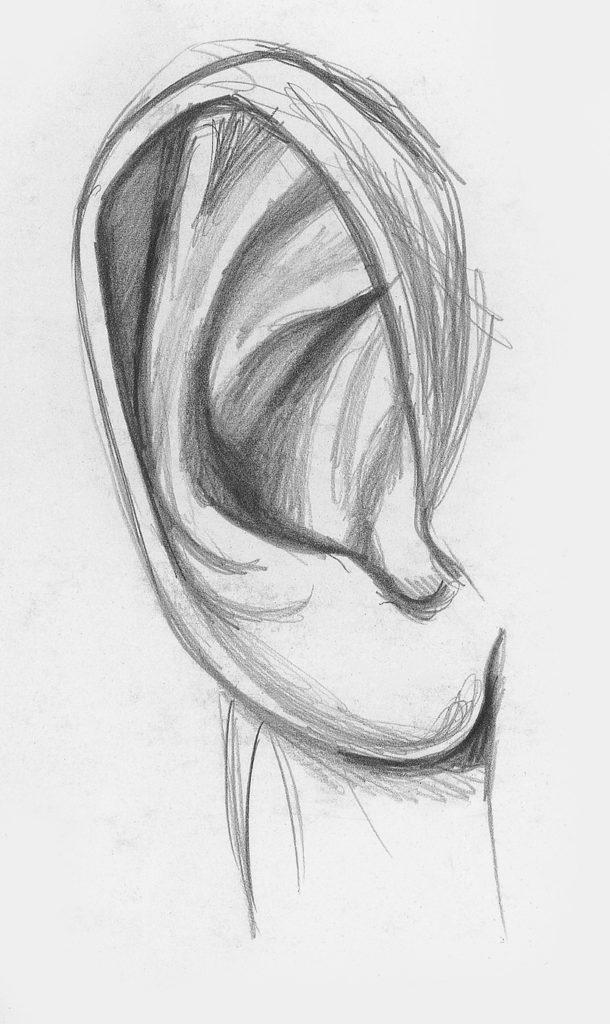
3. Alloy and Lift
Blend the drawing with a stump or tortillion. To arrive look realistic, lift out highlights with a kneaded eraser.
The ear is a bit shinier than other skin, and so the highlights should be bright. Recollect the five elements of shading and the sphere when focusing on the earlobe.
Putting It All Together | Cartoon a Portrait
Now that you've learned how to draw facial features from the eyes to the mouth, it's time to put everything together into a portrait. Practise non do this project before you have washed the proper practice work. Go back and practice all of the facial features first.
And, before moving on, be sure to practice drawing pilus.
Video Lesson: Drawing a Woman'south Portrait
In this episode of our weekly live Drawing Together series, artist Scott Maier shows how to draw a woman's portrait.
Here are some tips for drawing portraits:
- When you desire to draw facial features, offset with the optics. This helps create a connection with the viewer and starts to capture the personality of your subject.
- When you finish the optics, motility downwards and finish the nose, then the mouth. This is called the triangle of features.
- Allow the darkness of the hair to help create the lighter edge of the face. Placing tone behind the face reduces the chance of things looking outlined.
- When drawing hair, apply your pencil strokes going in the same management every bit the hair growth.
- Always call back the 5 elements of shading with everything you lot draw.
How to Draw a Portrait
1. Create a Line Drawing
Employ the grid method and a mechanical pencil to create a line cartoon of a female confront. Go 1 box at a time and be very careful with the shapes.
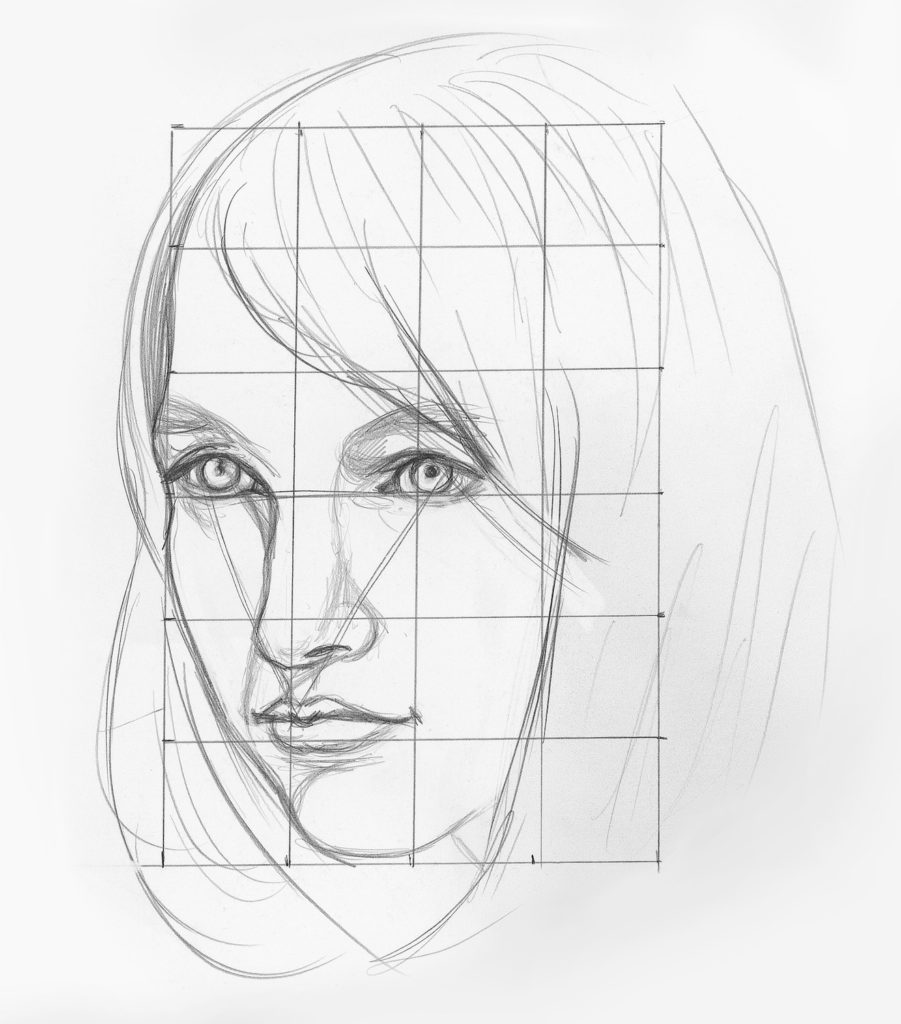
2. Use the Darks and Start Building upward the Hair
When you are sure of your accuracy, carefully remove the grid lines with a kneaded eraser. Apply the darkest tones.
Get-go with the optics and then movement down to the nose and mouth to create the triangle of features. Apply some dark tone adjacent to the face to help create the light edge of the face. Starting time to build the pilus using long pencil strokes.
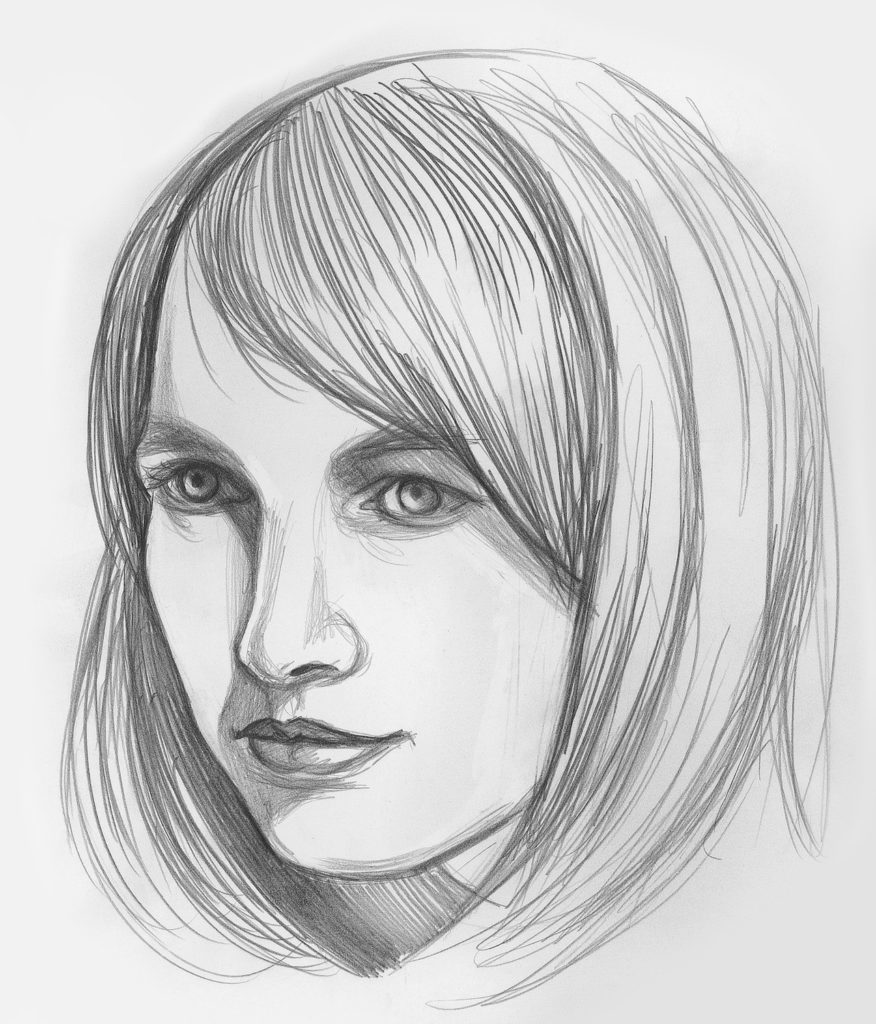
three. Blend and Lift
Have your time finishing. The face must exist composite very polish with a stump or tortillion. Fiddling of the drawing should be left pure white; merely the highlights in the eyes and on the nose appear white. As y'all complete the face, refer to the previous exercises on individual facial features and continue the five elements of shading in mind.
The hair in this portrait takes a lot of time. Utilise very long pencil strokes to create the length. Blend everything out smooth and and so elevator bands of light out of the pilus with a kneaded eraser.
Keep Practicing
Now that you have learned how to draw facial features, keep practicing! Lee Hammond's All New Big Volume of Drawing includes tons of quick step-by-step drawing demos geared toward beginners in both graphite and colored pencil, including how to describe facial features in colored pencil. You can too find more inspiration and techniques from Lee Hammond on her website.
Learning to Draw? Join Our Live Video Series, Drawing Together!
Acquire to draw faces, people, and much more in our alive weekly video series led past artist Scott Maier.
How to Depict an Centre How to Draw a Nose and Oral cavity
Drawing a Girl'southward Portrait Drawing a Self Portrait

Source: https://www.artistsnetwork.com/art-mediums/drawing/beginners-guide-draw-facial-features/
Posted by: bonetond1972.blogspot.com
0 Response to "Where To Start When Drawing A Face"
Post a Comment